
Email Setup
Thunderbird - Add New POP Email Account
This guide will give step-by-step instructions for setting up email on Thunderbird. While it can be used for many versions of Thunderbird, some screens and steps might vary.
If you don't feel comfortable making these changes or you simply prefer us to do it, we can set up your email accounts remotely using TeamViewer. The cost for this service is $10.00 per email account.
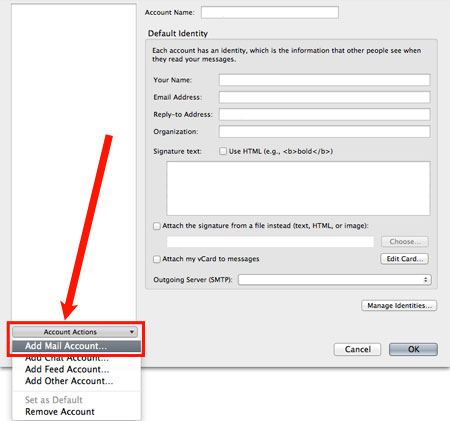
Adding a new POP mail account:
- On the top menu, select Tools and choose Account Settings.

- Click the Account Actions dropdown button and select Add Mail Account.
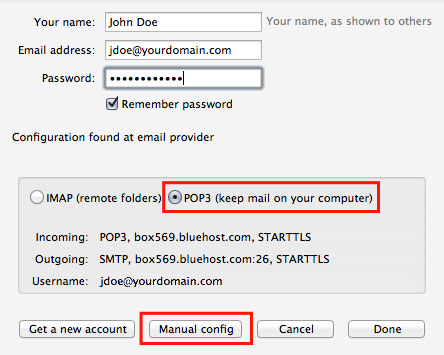
- Select the radio button for POP3 (keep mail on your computer).
- Click the Manual config button.
- Make sure your settings match these below exactly (other than replacing the examples with your username, password and server names).
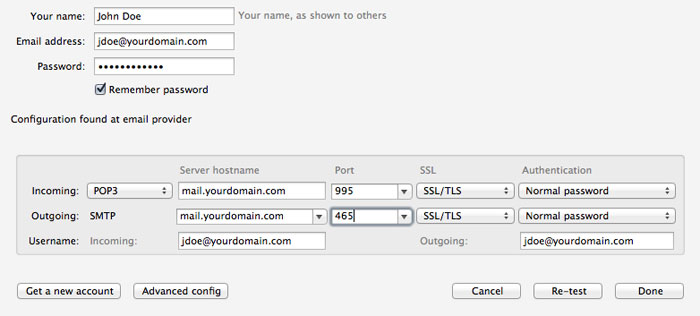
- Under the Server hostname column, enter mail.yourdomain.com for your Incoming server (POP3) and Outgoing (SMTP) server.
- Under the Port column, choose 995 for your Incoming (POP3) server and 465 for your Outgoing (SMTP) server.
- Under the SSL column, choose SSL/TLS for your Incoming (POP3) port and your Outgoing (SMTP) port.
- Under the Authentication column, choose Normal password for your Incoming (POP3) port and your Outgoing (SMTP) port.
- Your Username should be your email address for both Incoming and Outgoing.
- Click Done.
Server Settings:
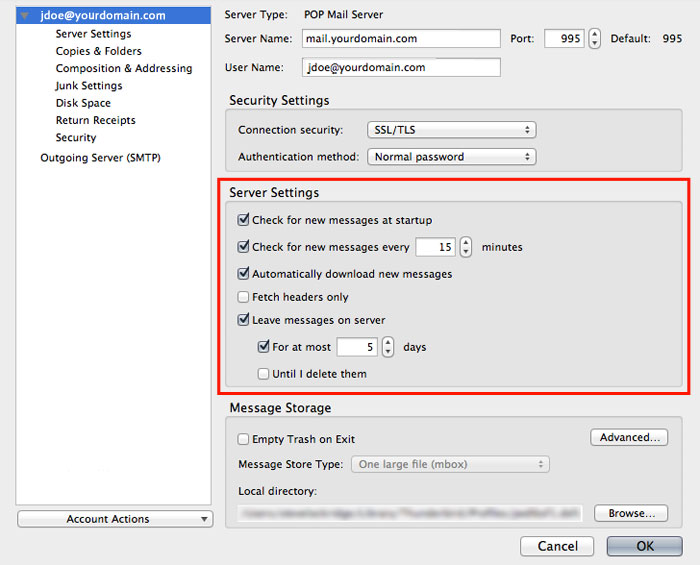
- Check for new messages at startup should be Checked.
- Check for new messages every should be Checked and the time is variable. We recommend setting this number no lower than 10 minutes. Frequent polling of the mail server by multiple email accounts can reduce its performance.
- Automatically download new messages should be Checked.
- Fetch headers only should be Unchecked.
- Leave messages on server may be Checked or unchecked. If it is Checked, read the next step below.
- If the Leave messages on server box is checked, For at most should also be Checked. We recommend setting the number of days no larger than five days to prevent a large buildup of email which can slow your email connection and reduce server performance.
- Click OK.
Verifying Server Identity:
- When you first send/receive email after setting up a new account, you may see a security warning message. This is normal. The secure certificate that encrypts your email is registered to the hosting company's domain name. When Thunderbird sees that it does not match your domain name it views it as a potential risk. All you have to do is confirm an exception for this mismatch.
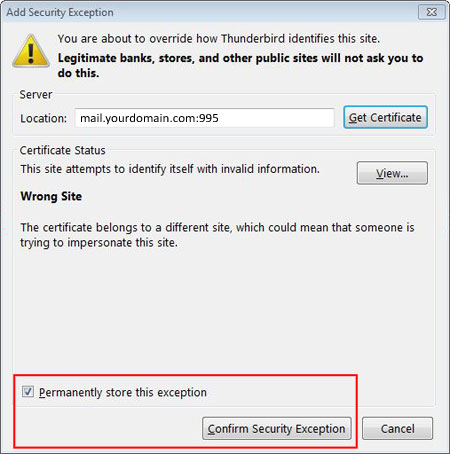
- Make sure the Permanently store this exception box is Checked.
- Click the Confirm Security Exception button.
Thunderbird is now correctly configured to send and receive emails.